Aug 28 2023

Welcome to the world of Flutter, where imagination meets innovation and code becomes art. Whether you're a seasoned developer or just starting, this guide will provide the insights and techniques you need to create stunning cross-platform applications.
Step 1: Setting Up Your Development Environment
A solid development environment ensures that you have the right tools and settings in place, creating a smooth workflow and reducing frustrations along the way.
- Installing Flutter and Dart SDK: Think of Flutter as your toolbox and Dart as your crafting material. Install them both to start building. If not, head to the official Flutter website and follow the installation instructions for your operating system.
Download the latest stable release Flutter SDK installation bundle.
Extract the Flutter zip file and place the contained Flutter in the desired location(e.g., C:\src\flutter; Please don’t install Flutter in a directory C:\Program Files\ that requires elevated privileges).
- Updating Your Path: If you're using the regular Windows console to run Flutter commands, you can streamline the process by adding Flutter to your PATH environment variable. Open the Start menu and search for 'env.' Choose "Edit environment variables for your account."
Look for an existing entry called "Path" under User variables. If it's there, append the full path to flutter\bin, using a semicolon as a separator from existing values.
If "Path" doesn't exist, create a new user variable named "Path" and set its value as the full path to flutter\bin. Remember, you'll need to close and reopen any existing command prompt windows for the changes to take effect.
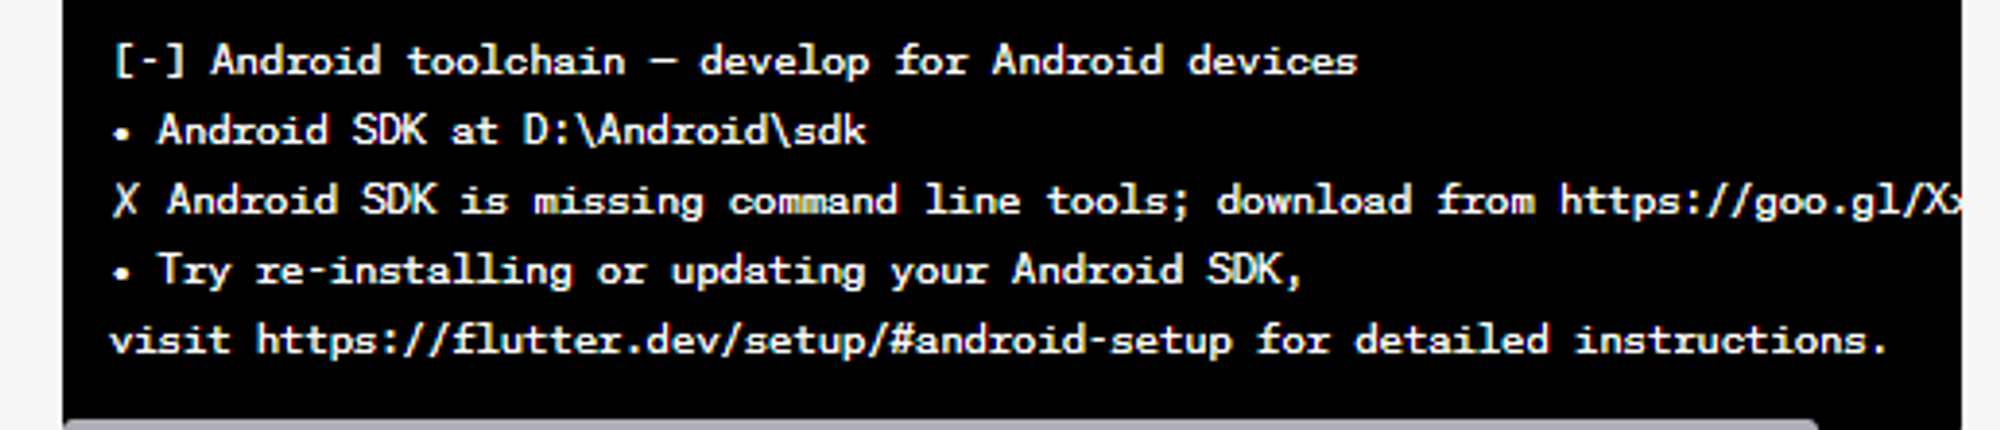
- Verifying Setup with Flutter Doctor: By running Flutter Doctor, you'll quickly identify and address any platform dependencies needed to complete your Flutter setup.
To ensure your Flutter setup is complete, open a console window where the Flutter directory is added to the PATH. In the console, enter the command flutter doctor and press Enter. The output will show if there are any missing platform dependencies. For example, if the Android toolchain is missing, you might see an error message like the one below:
Step 2: Choosing an Integrated Development Environment (IDE)
The Role of IDEs: Just as an artist selects their canvas and brushes, developers choose an IDE. Android Studio and Visual Studio Code are your creative studios – each has its strengths and features tailored for Flutter development.
Android Studio: If you're looking for an all-in-one solution, Android Studio is your masterpiece canvas. Benefit from features like code completion, debugging tools, and an Android emulator.
Visual Studio Code (VS Code): If you prefer a lightweight, customizable environment, Visual Studio Code is your go-to. With Flutter extensions, it transforms into a Flutter-focused IDE, equipped with debugging, code snip=pets, and hot reload.
Google recommends using VS Code because the instructions default to VS Code-specific shortcuts. It's easier to say things like "click here" or "press this key" instead of something like "do the appropriate action in your editor to do X".

Step 3: Create a New Flutter Project
Launch Visual Studio Code, access command palette (Use F1 or Ctrl+Shift+P or Shift+Cmd+P) trl + Shift + P (Windows/Linux), or Shift + Cmd + P (Mac). Navigate to the directory you'd like to create your project. Start typing "flutter new." Select the Flutter: New Project command.
Name your project like myfirstapp.
Project Structure: Your Flutter project will have directories like lib (where most of your code will live), assets (for images and other resources), and test (for testing your app).
Main Dart File: You'll find your main Dart file within the lib directory. This is where your app's journey begins. You'll define your app's entry point here, and it's the first file that gets executed when your app runs.
Widgets and main() Function: In the main Dart file, you'll use widgets to construct your app's user interface. Everything in Flutter is a widget, from a simple text element to an entire screen. The main() function will call the widget that serves as the root of your app.
The Default App Template: Flutter provides a default app template that gives you a head start. It sets up a basic user interface, making it easier to dive into development immediately. It's like a canvas with a preliminary sketch ready for you to add your creative touch.
Unlock Endless Possibilities With Flutter
Transform your app ideas into reality with the power of flutter app development
Talk to Flutter ExpertsStep 4: Understanding Widgets and the Widget Tree
Widgets: At the core of every Flutter app are widgets– they define how your app looks, behaves, and responds. From simple text to complex animations, widgets form the essence of your app.
Stateless vs. Stateful: Widgets come in two flavors: stateless and stateful. A stateless widget represents static content that doesn't change over time. In contrast, a stateful widget can change, adapt, and react to user interactions.
Hierarchical Structure: Just as a tree has branches and leaves, your app's user interface is structured hierarchically using widgets. The widget tree defines the arrangement and appearance of all the elements on your screen.
Nesting Widgets: Building your UI is like constructing a puzzle. You start with a parent widget, then nest child widgets within it. This hierarchy shapes your app's layout and design.
Widget Building Blocks: Think of each widget as a building block. You stack them together to create intricate layouts and interactions. Every widget adds depth and functionality to your app, from text and images to buttons and input fields.
Step 5: Building the User Interface (UI)
Layout Widgets: Widgets like Row, Column, and Container help you organize and structure your UI elements. Row and Column align items horizontally and vertically, while Container provides a way to style and position elements.
Text and Images: Flutter's Text widget lets you display text with different fonts, sizes, and styles. Image widgets bring visuals to life, whether you're displaying icons or user profile pictures.
- Improving Responsiveness and Accessibility
Using Expanded and Flexible: Flutter offers Expanded and Flexible widgets that help your UI adapt to different screen dimensions. For example, you can wrap widgets in an Expanded to make them expand and occupy available space proportionally.
MediaQuery: To truly understand the available screen space, Flutter provides the MediaQuery widget. With it, you can adjust widget sizes, fonts, and spacing based on the device's screen dimensions.
- Enhancing Accessibility
Semantic Widgets: Flutter offers semantic widgets that provide hints to assistive technologies. For instance, using Semantics widgets to add labels to images helps screen readers describe the image content.
Test Accessibility: To ensure your app is accessible, use Flutter's built-in tools to simulate how screen readers interact with your app. This way, you can identify and fix potential accessibility issues.
- Styling Your App
Colors and Themes: Colors play a vital role in branding and user experience. With Flutter, you can easily define a color palette and apply consistent themes throughout your app.
Font Styling: Typography can convey emotions and aesthetics. Flutter lets you apply various fonts and text styles to make your app visually engaging.
- Adding a Card and Navigation Rails
Creating a Card: Open the lib/main.dart file of your project. Inside the build method of your StatelessWidget, create a Card widget. Think of a Card as a virtual notecard where you can neatly arrange text, images, and more.
Adding Content: Within the Card widget, you can place various widgets like Text and Image to display information. Let's say you're building a weather app – you could place the current temperature and a weather icon inside the card.
Step 6: Adding Functionality with State Management
What is State: In app terms, state is like that switch – it determines how a widget behaves and appears based on interactions and data changes.
Stateful Widgets: These widgets can change over time. For instance, a weather app that updates temperature when you swipe down uses stateful widgets to manage and display dynamic data.
Reacting to User Actions
Handling User Input: Whether it's a button tap, text entry, or swipe gesture, your app needs to respond. State management lets you control how your app reacts to these interactions.
setState() Method: This is your toolkit for changing state and prompting your app to update. When you tap that "Like" button, setState() makes sure the heart icon turns red.
Step 7: Navigating Between Screens
What is Navigator: The Navigator widget helps users jump between different parts of your app.
Creating Routes: Think of each screen as a location and routes as paths to those locations. You'll define routes for various screens, making it easy for users to navigate.
- Seamlessly Transitioning
Push and Pop: Like opening and closing chapters, you'll use Navigator to push new screens onto the stack and pop them off when you're done. This creates smooth transitions.
Named Routes: Give your screens names, like "Home" or "Settings," and use these names to navigate. This approach keeps your code organized and readable.
- Inserting External Packages
Using Packages: Flutter's package ecosystem is rich and diverse. You can find packages for everything from UI enhancements to database integration. To start, explore the packages available on the official Dart package repository (pub.dev).
Adding a Package: You want to add a package that provides beautiful animations. Open your project's pubspec.yaml file and add the package's name and version under the dependencies section. After that, run Flutter packages and get into your terminal to install the package.
Step 8: Testing and Debugging Your App
Logging: Flutter's logging system helps you trace the steps your code takes. Print statements become your clues.
Debugging Tools: Flutter's development environment offers robust debugging tools, including hot reload – a quick way to see changes without restarting your app.
Your First Flutter App is Just a Step Away
Join OakTree Apps today and begin your exciting journey in Flutter app development
Schedule a ConsultationConclusion
By mastering these eight steps, you're not just building an app – you're crafting an experience. Flutter empowers you to create apps that run beautifully on both Android and iOS with one codebase. So, grab your IDE, flex your coding fingers, and let's turn your app idea into reality.